顯示具有 Programming 標籤的文章。 顯示所有文章

2016/09/18

[Windows] Visual Studio + OpenCV

Reference:
將OpenCV完美建置於Visual Studio上
Setting Up OpenCV 3.1 in Visual Studio 2015 (Youtube Video)

To make OpenCV work correctly with Visual Studio 2015, you should download OpenCV which version is newer than 3.1

You can use the testing code below to confirm whether it works
Remember to add

#include <iostream>
#include <opencv2/core/core.hpp>
#include <opencv2/highgui/highgui.hpp>

at the beginning of the source code
#include 
#include 
#include 

using namespace std;
using namespace cv;

int main(int argc, char** argv)
{
 argv[1] = "D:\\picure.jpg";
 Mat image;
 image = imread(argv[1], CV_LOAD_IMAGE_COLOR);

 if (!image.data)
 {
  cout << "No Image" << std::endl;
  return -1;
 }

 namedWindow("Display", CV_WINDOW_NORMAL);
 imshow("Display", image);
 waitKey(0);

 return 0;
}
 

2016/07/05

[Python] PyPI (Python Package)

https://pypi.python.org/pypi

[Python] pip.py path in Windows

If you get the error message "pip is not recognized as an internal or external command,
operable program or batch file."  Add the path below to environment variable:

C:\Users\User_Name\AppData\Local\Programs\Python\Python35-32\Scripts

2016/06/21

[Babun] compile with g++

Babun is a shell that allows you to use Unix/Linux command in Windows system.

If you see the message "fatal error: stddef.h: No such file or directory" in babun while compiling cpp source file.

Just use the command to update

pact update gcc-core gcc-g++

[Clion] Quick Start Guide

https://www.jetbrains.com/help/clion/2016.1/quick-start-guide.html

2016/05/11

[Go] GOPATH

export GOROOT=$HOME/go
export GOPATH=$HOME/gopath
export PATH=$PATH:$GOROOT/bin

Reference: https://golang.org/doc/install

It is better to install go by downloading binary file.
If you use apt-get to install go, do not set "export GOROOT=$HOME/go"
To unset that, type "unset GOROOT"

[Vim] Vundle (Vim Plugin Manager)

為了替vim加入輔助不同語言開發的plugin
爬文所發現的plugin manager
基本上想要加上新的vim plugin,只要在.vimrc設定檔中加入Plugin 'plugin name'
再到vim裡面執行:PluginInstall,就會自動幫你處理到好,非常方便。


2016/04/17

[Go] Golang Learning Resource


[Websites]


1. https://github.com/dariubs/GoBooks
2. http://www.golang-book.com/
3. https://github.com/ardanlabs/gotraining/tree/master/reading?utm_content=buffere9092&utm_medium=social&utm_source=twitter.com&utm_campaign=buffer


[Books]


1. The Little Go Book (從變數命名判斷作者一定是七龍珠迷...)
http://openmymind.net/The-Little-Go-Book/


[Reference]


1. Golang.org
2. Go by Example
3. Go Tutorial
4. GoDoc

to be continued...

[Go] Golang plugin for Intellij platform


Reference: https://plugins.jetbrains.com/plugin/5047
Project on Github: https://github.com/go-lang-plugin-org/go-lang-idea-plugin

Link below is the autocompletion tool Gocode for Golang
https://github.com/nsf/gocode


(4/18 update) 

Golang plugins for Atom Editor


Golang plugin for Visual Studio Code

2016/03/01

[Linux] vim-youcompleteme installation


Project: http://valloric.github.io/YouCompleteMe/#ubuntu-linux-x64-installation

一個讓vim具備程式碼自動完成的plugin


(每年都有學弟妹抱怨在Linux上拿vim coding很難用...我想大概跟打洛克人一樣,素身X當然不好用啊www)

除了透過專案網址提供的方法,Ubuntu/Linux Mint也可以利用下列方式安裝:

sudo apt-get install vim-youcompleteme
sudo apt-get install vim-addon-manager
vam install youcompleteme

Reference: http://blog.csdn.net/pdcxs007/article/details/49103981


2016/01/18

[Android] Debug Without USB (use Wi-Fi)

不想要每次Debug時都拿USB線拔來拔去,可以透過無線網路的方式來取代
需要注意的是運行Android Studio開發工具的PC跟Android Device必須在相同區網內
傳統方法是自行下指令切換ADB連接模式,後來有人把它寫成Android Studio的plugin


[Android Studio Plugin]

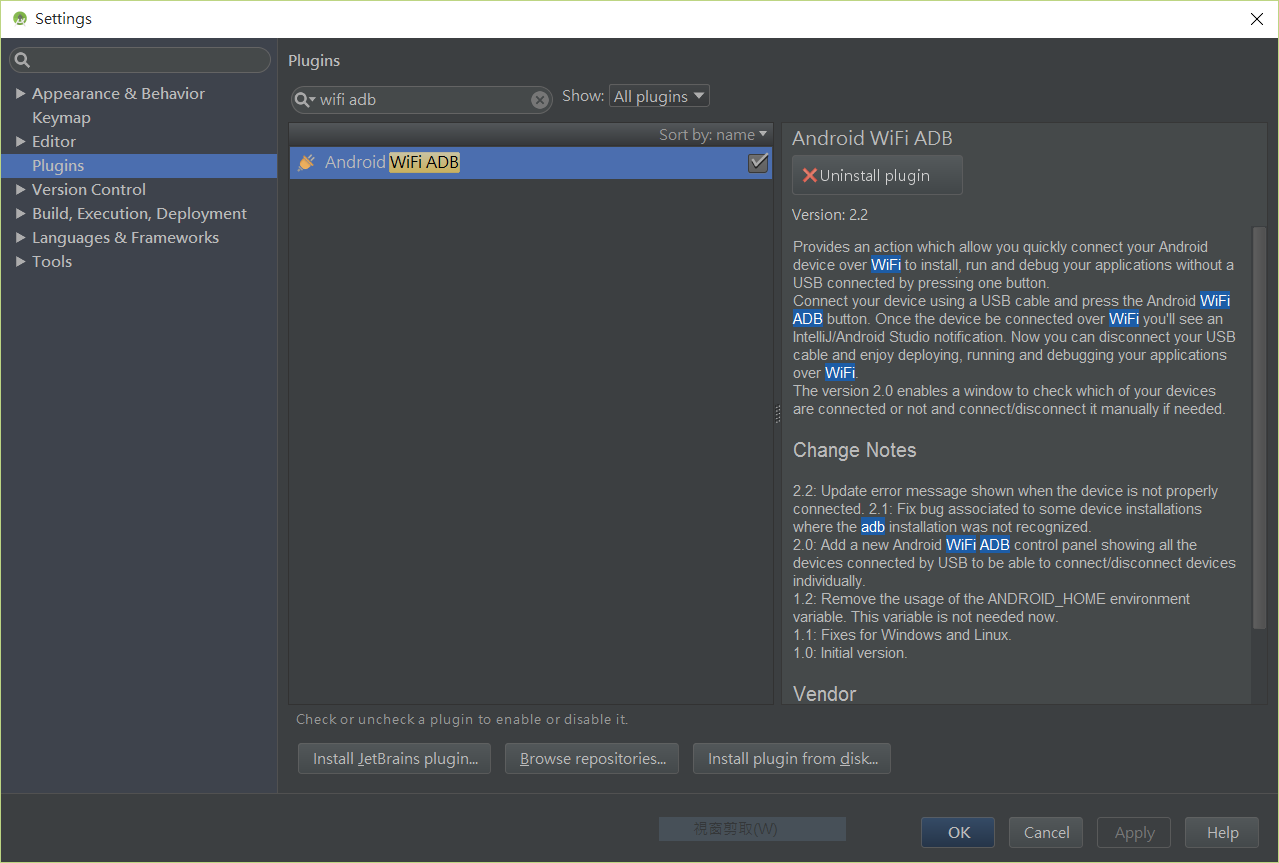
從工具列 File -> Settings -> Plugins
搜尋wifi adb,把它裝起來就可以


Android裝置第一次使用要先用USB連線,再點工具列上面的plugin圖示
它會出現連線成功與否的提示訊息,之後斷開USB,按執行就能透過Wi-Fi來做debug了


Project on Github: https://github.com/pedrovgs/AndroidWiFiADB


[Manual in Command Line]


1.
首先進入Android Studio SDK的路徑,預設安裝路徑應該長得像下面這樣
C:\Users\使用者名稱\AppData\Local\Android\sdk\platform-tools

2.
(將Android Device以USB線連接到電腦)
開啟命令提示字元

adb devices
可以檢視連接的裝置名稱,如下圖


記下裝置名稱(像圖中HT33BTP00443的部分)

3.
adb -s Android裝置名稱 tcpip 5555


4.
adb connect  Android裝置IP
出現連線成功訊息後,就能在Android Studio中選擇作為debug裝置
之後想變更連線類型的話,請參考下面這篇的作法
http://cms.35g.tw/coding/adb%E4%BD%BF%E7%94%A8wifi%E9%80%B2%E8%A1%8C%E9%99%A4%E9%8C%AF-adb-wifi/

2015/05/06

[轉] eclipse 快捷鍵

常用:
ctrl+/ 註解
ctrl+\ 取消註解
ctrl+o 快速搜尋method
ctrl+e 快速切換分頁
ctrl+h 搜尋資料
ctrl+k 搜尋相同資料 +shift(上一個)
ctrl+g 工作中申明
ctrl+. 下一個錯誤
ctrl+1 快速修正
ctrl+q 回到最後編輯行
ctrl+t 查看類別結構
ctrl+m 放大編輯視窗
ctrl+shift+/ 多行註解
ctrl+shift+\ 取消多行註解
ctrl+shift+r 搜尋檔案
ctrl+shift+i 顯示變數資訊
ctrl+shift+g 參照搜尋
ctrl+shift+p 找對應括號
ctrl+shift+l 查看其他快捷鍵
ctrl+shift+f 格式化程式碼
ctrl+shift+o 引入package(all)
ctrl+shift+m 引入package
ctrl+alt+h 查詢引用
ctrl+alt+s svn
alt+up or down 當行上下移


2014/09/06

POJ 1915 Knight Moves

Description
Background
Mr Somurolov, fabulous chess-gamer indeed, asserts that no one else but him can move knights from one position to another so fast. Can you beat him?
The Problem
Your task is to write a program to calculate the minimum number of moves needed for a knight to reach one point from another, so that you have the chance to be faster than Somurolov.
For people not familiar with chess, the possible knight moves are shown in Figure 1.

2014/09/01

用 Notepad++ 寫 C/C++

1. Plugins -> NppExec -> Follow $(CURRENT_DIRECTORY)
    (如果沒有看到NppExec,就到Plugin Manager找到它然後安裝)

2.把Compiler的位置加入系統環境變數
   如果電腦上已經有安裝其他IDE(ex: Dev C++、CodeBlocks),可以直接拿他們的Compiler來用
    以安裝Dev C++的電腦為例,在環境變數path中加入
    C:\Program Files (x86)\Dev-Cpp\MinGW32\bin

3.Plugins -> NppExec -> Execute 
   (或者直接用快捷鍵 F6)
   接著在欄位內填入
 
   你的Compiler位置  "$(FULL_CURRENT_PATH)" -o $(NAME_PART)
 
    以接續第二步驟的例子來說,就是

    C:\Program Files (x86)\Dev-Cpp\MinGW32\bin\g++.exe "$(FULL_CURRENT_PATH)" -o $(NAME_PART)

4.設定完成就可以在Notepad++裡面coding了,寫完之後存成c/cpp檔,按下F6即可編譯

5.要執行的話就在Notepad++下方console畫面輸入執行檔名,就可以看到執行結果


[自動完成]

使用其他IDE有個好用的功能,就是自動完成符號配對和提示參數名稱
在Notepad++要開啟這個功能,從 自訂 ->使用者自訂 -> 字詞自動完成功能 裡面去做設定